Wax Candle Making Machines

Cambia Idioma a Español

Candle Making Machine Video of Candle Making Machine Wax Melting Oven - Electrically Heated Instruction Manual for Candle Making Machine
CANDLE MAKING MACHINE - MODEL: WCM-SA

Top

candle making machine

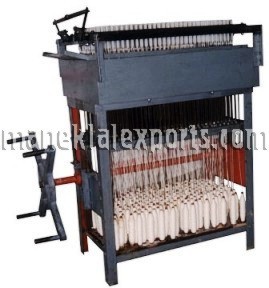
- Hand Operated Semiautomatic Machine

- Simple operation (Pour melted wax, after cooling operate handle, cut threads and the candles are ready)

- Brass Pipe moulds provided for smooth seamless candles

- System provided for quick cooling with water circulation

- Candle Length adjustable

- Available for making Plain, Plain - Birthday type, Tapered, Spiral and Grooved / Fluted Candles

Specifications:  
Model: WCM-SA/C6 WCM-SA/C8 WCM-SA/C10 WCM-SA/C11 WCM-SA/C13 WCM-SA/C14 WCM-SA/C16 WCM-SA/C17 WCM-SA/C19 WCM-SA/C20
Candle Diameter (mm): 6.5 8 10 11.5 13 14.6 16 17.5 19 20
Max. Candle Length (adjustable) (mm): 125 200 225 225 250 250 250 250 250 250
Number of candles per operation: 200 / 300 / 400 200 / 240 / 300 200 / 240 / 300 200 / 240 / 300 200 / 240 200 / 240 200 / 240 200 / 240 200 / 240 200 / 240
Type of Candle: Birthday Candle Plain / Cylindrical Plain / Cylindrical Plain / Cylindrical Plain / Cylindrical Plain / Cylindrical Plain / Cylindrical Plain / Cylindrical Plain / Cylindrical Plain / Cylindrical
Specifications:  
Model: WCM-SA/C21 WCM-SA/C22 WCM-SA/C24 WCM-SA/C25 WCM-SA/C30 WCM-SA/C36 WCM-SA/T20 WCM-SA/S21 WCM-SA/F21
Candle Diameter (mm): 21 22.5 24 25.5 30 36.5 Base: 20
Tope: 18
Base: 21.5
Tope: 9
Base: 21.5
Tope: 18
Max. Candle Length (adjustable) (mm): 275 275 300 300 410 410 200 260 240
Number of candles per operation: 120 / 200 120 120 120 60 40 120 60 / 120 120
Type of Candle: Plain / Cylindrical Plain / Cylindrical Plain / Cylindrical Plain / Cylindrical Plain / Cylindrical Plain / Cylindrical Taper Spiral, Taper Grooved / Fluted
Technical Details  
Model: WCM-SA
Approximate Time Taken per Operation / Cycle: 10 a 12 minutes
Approximate Dimensions: 1.7 x 0.8 x 1.5 m
Net / Gross Weight: 350 / 450 kg.
Approximate Shipping Volume: 2.1 m3 
 

Standard Accessories: Plastic Bobbins, Knife and Steel Wire for Threading
Optional Accessories:
Candle Wick, Hand Operated Bobbin Winding attachment, Spare Wooden Bobbins, Spare Brass Nozzle with Steel Piston


Note: Specifications mentioned for standard machines. We also supply Machines for making Candles of Dimensions as per customer’s requirement and Specifications


VIDEO OF PLAIN CANDLE MAKING MACHINE


WAX MELTING OVEN - ELECTRICALLY HEATED

Top

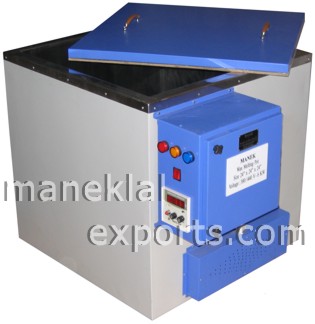
Construction Features of the Oven:

- Mild Steel Angle Frame & Mild Steel Sheet Welded
- Insulation of glass wool between the two walls to prevent heat loss
- Heating element provided at the bottom of the chamber
- Inner chamber made of Stainless Steel SS-304
- Top side lid provided

Specifications:
 
Model: WMO-50 WMO-100 WMO-150 WMO-200
Capacity: 50 liters 100 liters 150 liters 200 liters
Size of Chamber: 380 x 380 x 380 mm 500 x 500 x 500 mm 600 x 600 x 530 mm 700 x 700 x 530 mm
Power Rating: 3.5 kW 6 kW 7.5 kW 12 kW
Tapping: Manually from the bottom Manually from the bottom Manually from the bottom Manually from the bottom
Temperature Controller: Digital Digital Digital Digital
Maximum Operating Temperature: 100o Centigrade 100o Centigrade 100o Centigrade 100o Centigrade
Dimensions: 460 x 460 x 560 mm 590 x 590 x 690 mm 690 x 690 x 720 mm 790 x 790 x 720 mm
Net / Gross Weight: 55 / 85 kg 85 / 140 kg 130 / 190 kg 160 / 250 kg.
Shipping Volume: 0.2 m3 0.3 m3 0.4 m3 0.5 m3


INSTRUCTION MANUAL FOR CANDLE MAKING MACHINE

Top

I. CATALOGUE OF MACHINE SHOWING DIFFERENT PARTS

II. SETTING UP THE MACHINE

III. LOADING THE BOBBINS

IV. THREADING THE MACHINE

V. WATER COOLING

VI. ADJUSTMENT OF LENGTH OF CANDLE

VII. LUBRICATION OF PIPES

VIII. POURING OF WAX

IX. REMOVAL OF EXCESS WAX & EXCESS THREAD

X. EJECTION OF CANDLES

XI. REMOVAL OF CANDLES

XII. SECOND BATCH OPERATION

XIII. SPECIAL INSTRUCTIONS


I. CATALOGUE OF MACHINE SHOWING DIFFERENT PARTS:

INDEX

Top

  1. Water Tank with Brass Inlet and Outlet Pipeset Pipes

  2. Ejectors with Brass Nozzles

  3. Slope Plate

  4. Bobbins loaded with Thread

  5. Wooden Catch Board

  6. Length Adjustment Screws

  7. Steel Rack & Pinion

  8. Cast Iron Handle

  9. Iron lever of Catch Board

  10. Ready Candles

II. SETTING UP THE MACHINE:

INDEX

Top

PLEASE FOLLOW THE START UP INSTRUCTIONS IN THE ORDER THAT THEY ARE PRINTED.
Clean the machine with KEROSENE and PETROL to remove all dried grease / oil from the pipes / moving parts / rack-gear.
Apply fresh GREASE to Rack-Gear for smooth & easy operation.

CEMENTING OF WATER TANK
The water tank should be cemented properly so that water does not leak from base of the tank.
First put pure cement mixed in water in semi-solid form upto approximately 1” height. Then cover this cement layer with a mortar mixture consisting ¼ part sand and 3/4 parts cement.
THIS WHOLE CEMENTING SHOULD BE JUST BELOW THE LOWER INLET FOR WATER:
Keep the inlet hole plugged from inside so that cement does not clog the inlet.
Now shake the machine vigorously and thoroughly so that any voids / air bubbles in the cement/mortar layer are removed and the mixture reaches all parts and corners of the water tank.
Remove the Plug from the inlet and leave the machine alone for at least 36 to 48 hours so that cement sets in firmly.

III. LOADING THE BOBBINS:

INDEX

Top

All wooden bobbins should be kept ready and loaded with thread.
Bobbins may be loaded from hanks of thread with the help of Thread Winding Attachment & thread stand (Both optional items).
One hank should be mounted on the thread stand and it’s end should be tied up with one wooden bobbin which in turn is fitted on the Thread Winding Attachment.
The Thread Winding Attachment will rotate the wooden bobbin, which will in turn unreel the hank of thread.
This way, the bobbins may be loaded to required quantity.
All the bobbins may be loaded and kept ready for first batch of production.
IV. THREADING THE MACHINE:

INDEX

Top

All the bobbins (loaded with thread) should be transferred to the wooden base of the machine where locators are provided.
All the pipes should be threaded with the help of thin steel wire provided.
Prepare a loop at one end of the wire, insert it from the top end of the machine (from the upper opening of pipes from where the molten wax is poured) by bringing ejectors upward by rotating handle of the machine upto the plate level. Allow it to pass through the brass nozzles and steel pipes till it reaches the wooden bobbins. Now insert the end of thread in this loop and gently pull the wire upwards / back till the thread comes out at the top. Take out sufficient length of thread so that it does not fall back into the pipes.
When two nearby threads are pulled up they can be tied / knotted to each other so that both threads do not fall down and operator can proceed to thread other pipes.
In the above mentioned manner all the pipes should be threaded.
After threading all the pipes, bring down the ejectors back by rotating the handle of the machine in clock-wise direction.
V. WATER COOLING:

INDEX

Top

Fill the water tank with water by connecting the lower inlet opening to the water tap and let this water come out from the upper outlet after the tank is full, thus maintaining the water circulation.
Better the water circulation quicker will be the cooling of candles.

CAUTION:
DO NOT FIX THE INCOMING WATER PIPE AT THE UPPER OUTLET.
VI. ADJUSTMENT OF LENGTH OF CANDLE:

INDEX

Top

The length of the candle can be set with the help of LENGTH ADJUSTMENT SCREWS.
The length of candles desired can be set / controlled by turning the adjustment screw (bolt with nut) provided on both the sides of the machine.
By turning the screw upwards - length of the candles is REDUCED.
By turning the screw downwards - length of the candles is INCREASED.
Adjust the screw till desired length of candle is obtained and then set it with the nut and let it remain till required production is obtained.
VII. LUBRICATION OF PIPES:

INDEX

Top

For initial start up, the BRASS PIPES should be oiled. Rotate the Cast-Iron Handle of the machine in the anticlockwise direction till the ejector system is raised fully and brass nozzles come out at the top of the pipes.
Apply coconut oil / caster oil on the entire outer surface of all brass nozzles (outer wall) with the help of a long bottle cleaner brush.
Now rotate the handle of the machine gently in the clock-wise direction so that the brass nozzles go down through the pipes. Since the nozzles are closely fit in the pipes, they will oil the inner surface of the brass pipes.
CAUTION:
PLEASE LUBRICATE THE BRASS PIPE AFTER EVERY 5-7 BATCHES OF PRODUCTION.
VIII. POURING OF WAX:

INDEX

Top

On a separate STOVE / GAS BURNER / ELECTRIC HOT-PLATE / FURNACE keep the Paraffin Wax ready in a molten state in a large vessel. Keep the pressure / supply of energy adjusted such that the wax remains molten at all times without either BOILING or SOLIDIFYING.
Now swiftly pour the molten wax on the slope plate, from where the wax will itself fill in all the brass pipes. Enough wax should be poured so that there is a thick layer of wax above the upper surface of the plate / pipes as this will ensure completely filled pipes and solid candles and will help prevent SHRINKAGE in candles.
Now allow the candles to cool for about 5 to 7 minutes, till they solidify properly and do not bend or get deshaped when ejected.
IX. REMOVAL OF EXCESS WAX & EXCESS THREAD:

INDEX

Top

The excess wax lying on the upper surface of the brass pipes should now be scraped / removed with the help of the long knife provided.
The scraped solidified wax should be added back to the wax melting vessel since it is REUSABLE.
PLEASE NOTE THAT SCRAPPING OF WAX IS REQUIRED ONLY ONCE, WHEN PRODUCTION IS STARTED FOR THE FIRST TIME.
X. EJECTION OF CANDLES:

INDEX

Top

After the cooling is completed, open the iron - lever of wooden catch board at the top of the machine. By doing so the holes in the wooden catch-board will expand.
Now operate the handle of the machine in the anticlockwise direction so that all the candles come upwards and go inside the expanded holes of the wooden catch board.
Close the iron lever of the catch board so that the candles are caught / held in the wooden catch board.
Bring back / rotate back the handle of machine in original position so that all ejectors go down.
XI. REMOVAL OF CANDLES:

INDEX

Top

Before removing the candles from wooden catch-board pour molten wax from the slope plate as described in Step No: VIII to produce second batch of candles. While the second batch of candles is cooling, the first batch has to be removed from the machine / catch board.
Cut the threads of the candles, which are in the wooden catch board with the help of long knife provided.
Now open the iron lever of catch board so that the holes expand and candles are released from it. The candles are now ready and may be dispatch for packing.
XII. SECOND BATCH OPERATION:

INDEX

Top

The second batch of candles is allowed to cool for 5 to 7 minutes.  Then excess wax is scraped, catch board is opened, the candles are brought up and held in wooden catch board.
Before cutting thread, wax for the next lot should be poured and allowed to cool down for 5 to 7 minutes before cutting the thread of the ready candles and scrapping away the excess wax. This way the process is to be repeated.
XIII. SPECIAL INSTRUCTIONS:

INDEX

Top

1. Do nut cut threads of candles before pouring wax for the next batch of candles to avoid the re-threading of the pipes unnecessarily.
2. If ever the ejectors / machine is jammed do not apply excessive force on the machine. Do not heat it machine either to remove the wax. Just pour boiling water in the water tank to release the wax that is stuck in the brass pipes.
3. To avoid rejects, watch out for empty bobbins. When thread in the bobbin is almost over, remove it from the bobbin stand and tie the end of the thread with the end of freshly loaded bobbins and replace with the new bobbin. This way threading operation with the loop will be avoided.
4. While stopping production of the machine at the end of the shift or day or for a long period, leave the last batch of candles in brass pipes itself. This will avoid re-threading of the machine and also any damage to the brass pipes from dust etc.
5. In case the brass nozzles / ejectors are clogged with wax, they can be cleared with the help of a thick wire provided (slightly thicker than the loop wire) for this purpose.
6. Apply grease / oil daily to machine.
7. Do not pour boiling wax in the machine as it will jam the machine.
8. Due to climate change, if the candles caught in the wooden catch-board start breaking or if the candles cannot be caught at all, the clamping can be adjusted by changing the NUT-BOLTS on the Iron Lever from one hole to other.

Maneklal Global Exports
67 Bajaj Bhavan, Nariman Point, Mumbai - 400021, INDIA
Tel: +9122-22041340 / 41 / 42. Fax: +9122-22041389
WhatsApp: +918879795490
e-mail: sales@maneklalexports.com / maneklalexports@gmail.com / Enquiry Form

Home  Top

TO OUR PAGE ON SMALL SCALE INDUSTRY PROJECTS

Back   Next